# Printing & Copies
# Printing and Copies
DEEC provides its employees with a modern copy and print system, the operating details of which are explained in this document.
For configuration purposes on computers, there are 3 virtual printers, whose names and function are:
- **CacifosColor** – Color printing will be output to the following physical printer: Konica Minolta C368
- **CacifosGrayscale** – Black & white printing will come from one of the following physical printers: Konica Minolta C368 or Konica Minolta 284e. If you print in color, the printout will be automatically converted to black & white.
- **Gab-3a4** – Black & white or color printing, as defined by the user, will be output to the following physical printer: Konica Minolta C280
- The specific hardware is abstracted from the user, meaning that in the event of a malfunction, you do not need to reinstall specific drivers;
- Transparent balancing is possible for the user, with obvious advantages at times of peak use;
- Duplex is enabled by default on all printers;
- Improvement of environmental impact;
- Overall reduction of printing costs;
- [Windows](https://helpdesk.deec.uc.pt/help/en-us/42/94 "https://helpdesk.deec.uc.pt/help/en-us/42/94")
- [Linux](https://helpdesk.deec.uc.pt/help/en-us/42/95 "https://helpdesk.deec.uc.pt/help/en-us/42/95")
The Physical equipment specifications are presented in the following table:
| **Place**
| | **Cost/page** |
|---|
| Konica Minolta C368 | Sala dos Cacifos | – A3
– Laser
– Color
– Duplex
– Scan to e-mail | B&W = 0.003€ Color= 0.03€
|
| Konica Minolta 284e | Sala dos Cacifos | – A3
– Laser
– Black & White
– Duplex
– Scan to e-mail | B&W = 0.003€ Color = 0.03€
|
| Konica Minolta C280 | Gabinete 3A.4 | – A3
– Laser
– Color
– Duplex
– Scan to e-mail | B&W = 0.004€ Color = 0.04€
|
To use this service you need a @deec.uc.pt or @uc.pt account!
### Introduction
In this document, the installation of the printers in the locker room and cabinet 3A4 on Windows will be presented step by step.
Installing the printer
**1 –** To install the printers it is necessary to download the drivers [here](https://gofile.me/3Cvzn/W9C93v0LA "https://gofile.me/3Cvzn/W9C93v0LA").
**2-** Run the client-local-install.exe installer located in the “drivers \\ client \\ win” folder in the ZIP file.
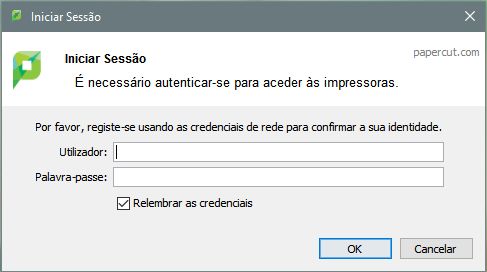
**3-** Enter your DEEC credentials.
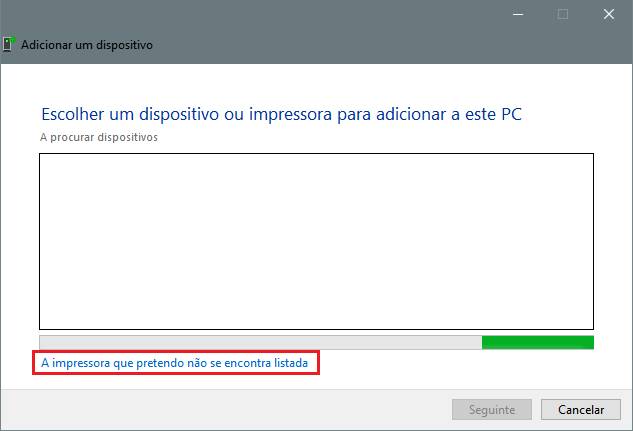
**4-** Subsequently, access the Control Panel, option “View devices and printers” and select the option “Add new printer”.
**5-** In the window that will open (Add a device), click on “The printer I want is not listed”.
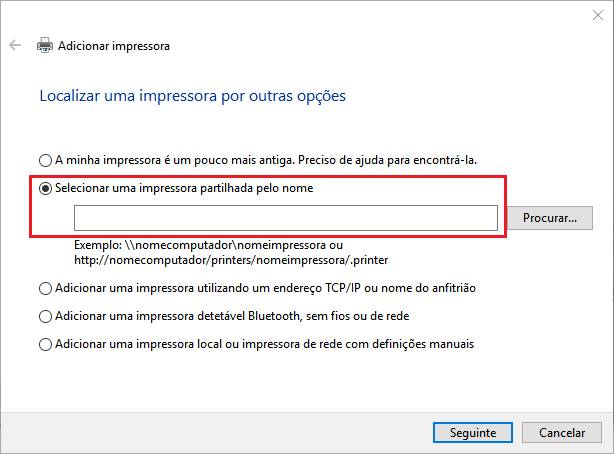
**6-** Then select the option "Select a printer shared by name" and enter the address of the printer you want to install:
- Color printer in the locker room: [http://print.deec.uc.pt:631/printers/CacifosColor](http://print.deec.uc.pt:631/printers/CacifosColor)
- Black and white printer from the locker room: [http://print.deec.uc.pt:631/printers/CacifosGrayscale](http://print.deec.uc.pt:631/printers/CacifosGrayscale)
- Color printer in 3A4: [http://print.deec.uc.pt:631/printers/gab-3a4](http://print.deec.uc.pt:631/printers/gab-3a4)
**7**– Then click on the “Disk” button and choose the driver that you downloaded in the first step of this manual.

**8-** Select the driver in the “drivers \\ drivers \\ win \\ PC-Global-Print-Driver” folder and click on next.

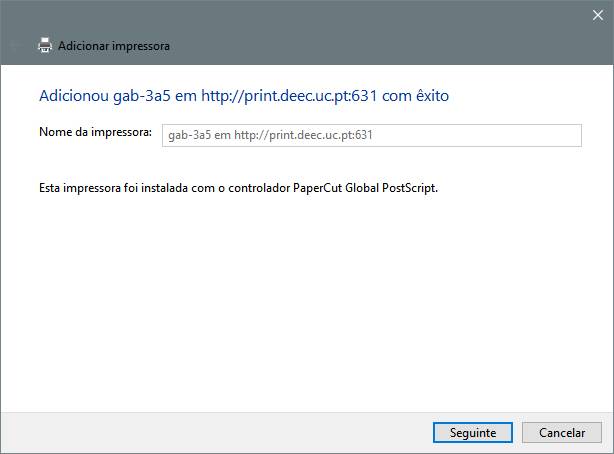
##### The printer is now successfully installed.
####
#### Default duplex printing
To perform default duplex printing, the following steps are required:
**1 –** Access the control panel.
**2 –** With the right mouse button on the desired printer, select the option “Printing preferences”.
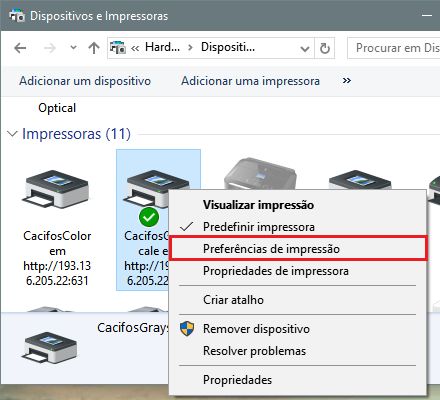
**3 –** In the "Printing Preferences" window, select the "Layout" tab and in the "Print on both sides" dropdown, use the option "Flip to the widest edge" or "Flip to the narrowest edge".

In this way, the prints you make will default to these settings.
# Printer Software Instalation for Linux
To use this service you need a @deec.uc.pt or @uc.pt account!
### Introduction
In this document, the installation of the printers in the locker room and cabinet 3A4 on Linux and Mac OS X using CUPS will be presented step by step.
To install the printer it is necessary to download the drivers [here](http://gofile.me/3Cvzn/nB8nE5opr "http://gofile.me/3Cvzn/nB8nE5opr").
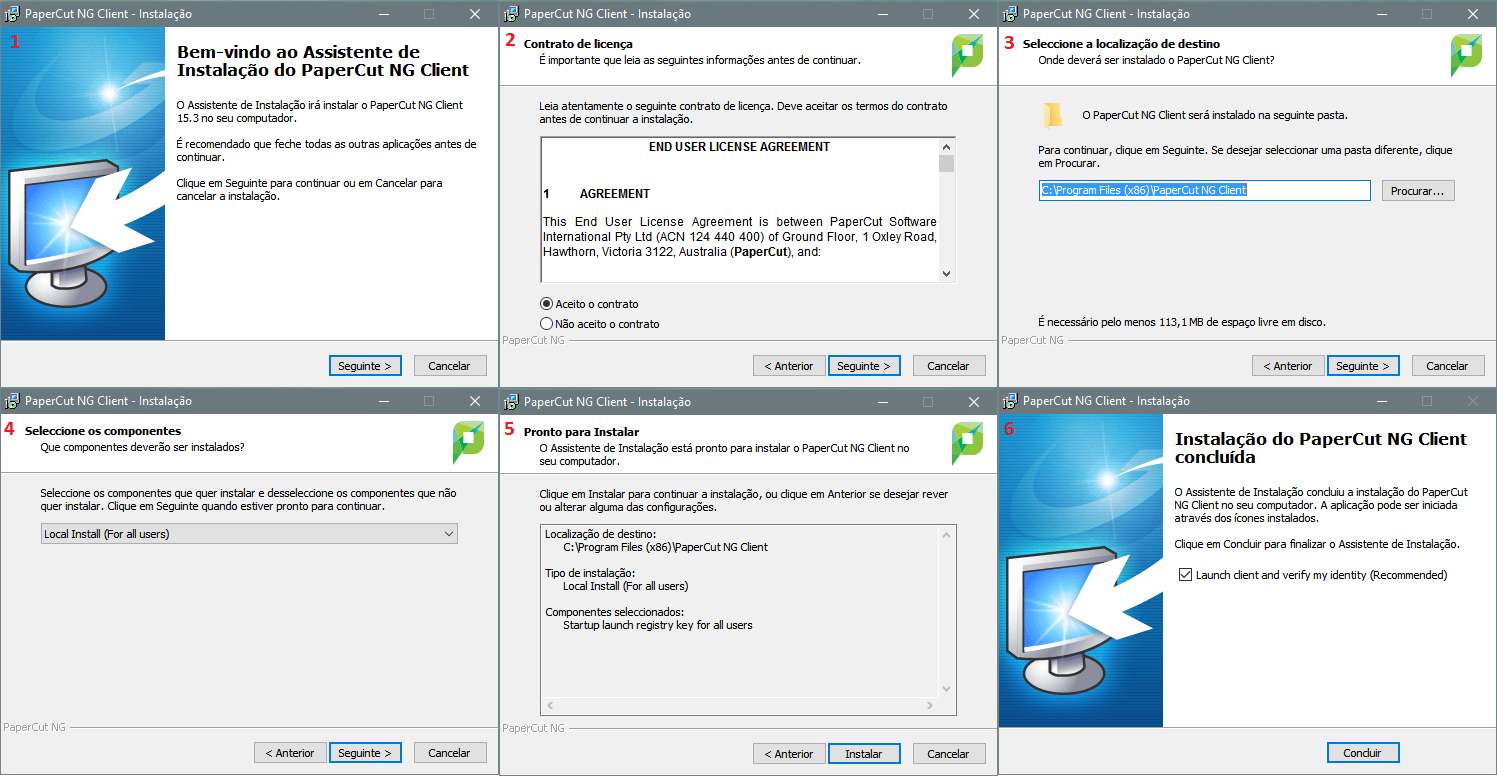
### Installing the PaperCut client
### **Note:** You cannot print without the PaperCut client.
- **Linux**
Name: PCClient
Command: /opt/papercut/drivers/client/linux/pc-client-linux.sh

- **Mac OS X**
Run the installer **client-local-install** located in the “drivers\\client\\mac” folder int the ZIP file.
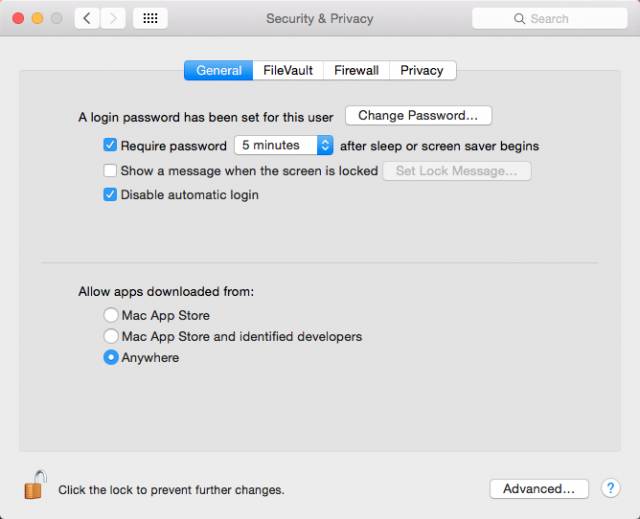
If you see the error “can’t be opened because it is from an unidentified developer.”, Go to System Preferences> Security & Privacy and under “Allow applications downloaded from:”, select “Anywhere”.
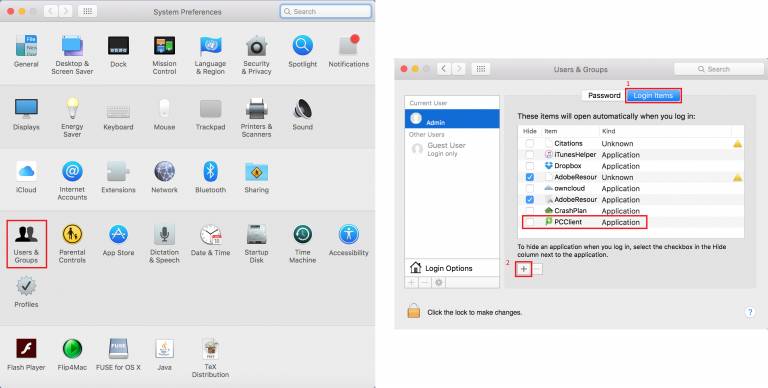
For the PaperCut client to start automatically with the operating system, it is necessary to go to System Preferences> Users & Groups and in “Login Items”, and add PCClient to the list (click on the “+”).
After installation, enter your DEEC credentials. 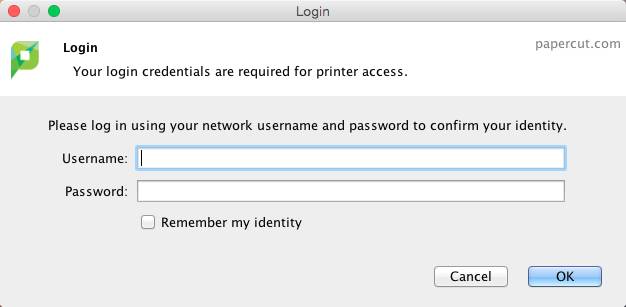
### **Installing the printer**
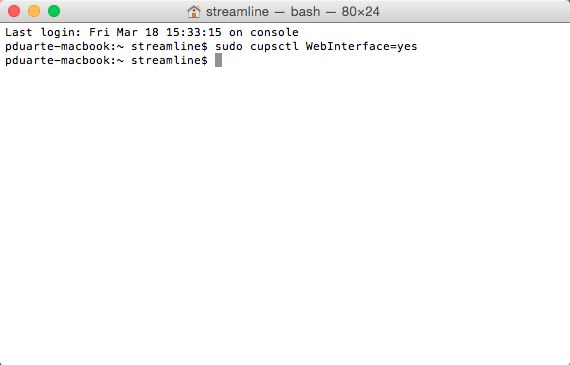
**1-** Open the Terminal and run the command “sudo cupsctl WebInterface = yes”:
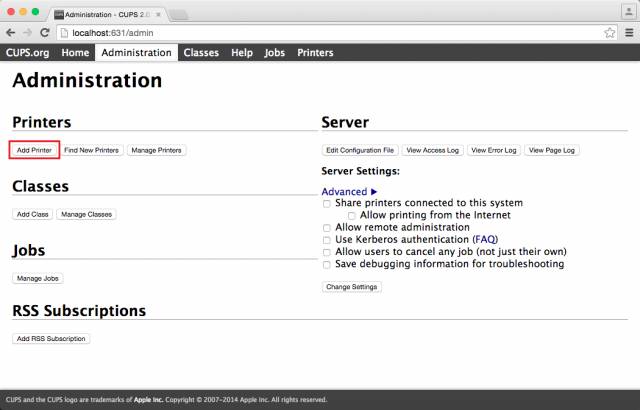
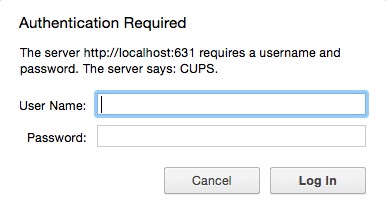
**2-** Through the browser access the address: http: // localhost: 631 /. Go to the “Administration” tab and “click on Add Printer”.
**3-** Enter your Mac's credentials.
**4-** Select “Internet Printing Protocol (https)”.
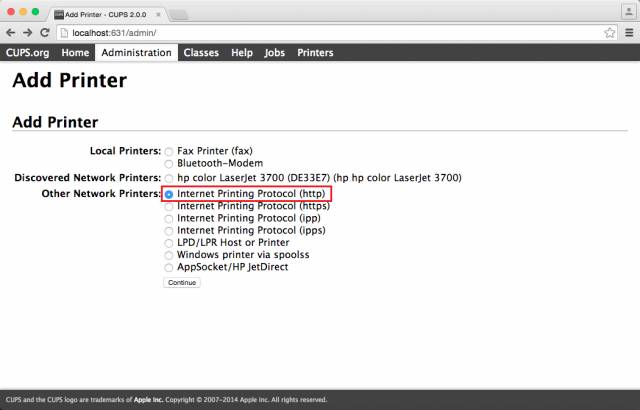
**5-** In the "Connection" field, enter the address of the printer you want to install:
- Color printer in the locker : [http://print.deec.uc.pt:631/printers/CacifosColor](http://print.deec.uc.pt:631/printers/CacifosColor)
- Black and white printer from the locker room: [http://print.deec.uc.pt:631/printers/CacifosGrayscale](http://print.deec.uc.pt:631/printers/CacifosGrayscale)
- Color printer in 3A4: [http://print.deec.uc.pt:631/printers/gab-3a4](http://print.deec.uc.pt:631/printers/gab-3a4)

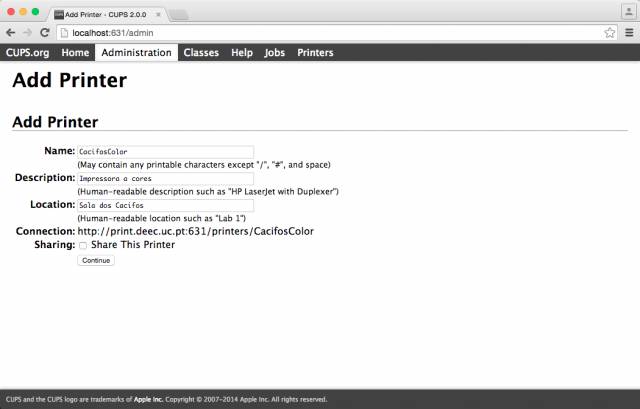
**6-** Fill in the following fields:
**7-** Select in the Make field select the option Generic and then select the driver “Generic PostScript Printer (en)”:

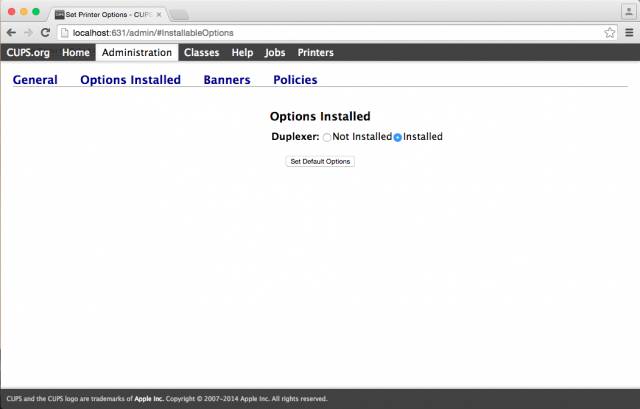
**8-** Open the Options Installed tab and in the Duplexer field, select the Installed option. Finally click on Set Default Options.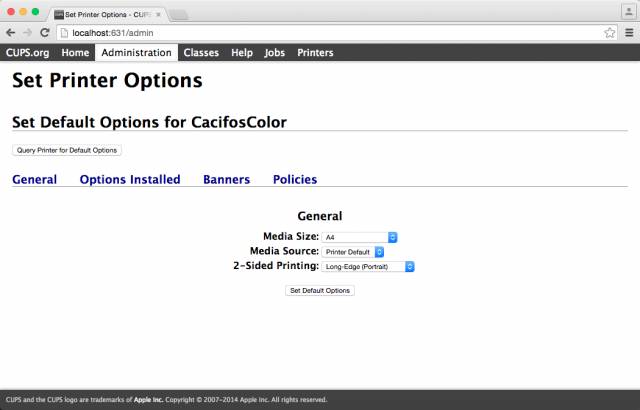
**9-** Abrir o separador Options Installed e no campo Duplexer, selecionar a opção Installed. Por fim clicar em Set Default Options.