Services
My DEEC
The My Deec platform is an evolutionary information system, with internal support for the department's activities, accessible by students, teaching and non-teaching staff, comprising the following major areas of functionality (available depending on the privileges of each user):
- Academics
- Documentation Archive
- Contacts
- Building
- Image & Communication
- Computing
- Inventory
- Organic
- Secretariat
You can access this system through the address (URL):
The login on the system is the e-mail address and the password is the one used on the respective e-mail account.
Personal Page Hosting Service
DEEC provides its employees with a service for the publication of personal web pages, for their enjoyment. This service is available through the URL
http://home.deec.uc.pt/~username.
The materials hosted through this service are the responsibility of each user and reflect their individual vision. The information published does not represent the opinion or policy of the Department, Faculty or University of Coimbra. Thus, the institution should not be associated with the users' view, expressed in the pages hosted on this service.
Personal Website Management
The access to the server, for editing the pages, is done through the FTP TLS / SSL protocol and your DEEC credentials.
The table below shows the settings that you should use in your usual TLS / SSL FTP client (we suggest
Cyberduck for OSX and Windows). Click
here for more complete instructions.
| Definition |
Description |
Value to be configured |
| Server |
Address of the server hosting the home.deec.uc.pt
|
home.deec.uc.pt |
|
Protocol
|
Protocol for interaction with the server, for manipulating remote
|
FTP TLS/SSL Explicit encryption |
| Username |
Username of the user to be connected to the server
|
DEEC domain username
(e.g., userx)
|
| Password |
Password of the user to be connected to the server
|
Password of the respective account
|
Path
|
Path in the file system, where the site is hosted
|
/home/<username>/public_html |
Location and permissions
The website must be contained in a folder, named public_html, within your account. If it is not yet created, you must proceed with its creation.
In addition, you must ensure that the folder and all files contained have the correct permissions (755 - u = rwx, g = rx, o = rx), using the command below, using the SFTP client:
chmod -R 755 /home/<username>/public_html
Previous Systems
The sites were automatically copied from the old server (THOR). If for some reason you were using the ISO-8859-1 encoding and your page contains unformatted characters, you can create an .htaccess file, with the following content, / home / <username> / public_html, to solve the problem:
AddDefaultCharset iso-8859-1
Connection to the Students server via SFTP
To use this service you need a @deec.uc.pt or @student.uc.pt account
1 - Download and install Cyberduck. To download it click
here (select Windows or Mac OSX).
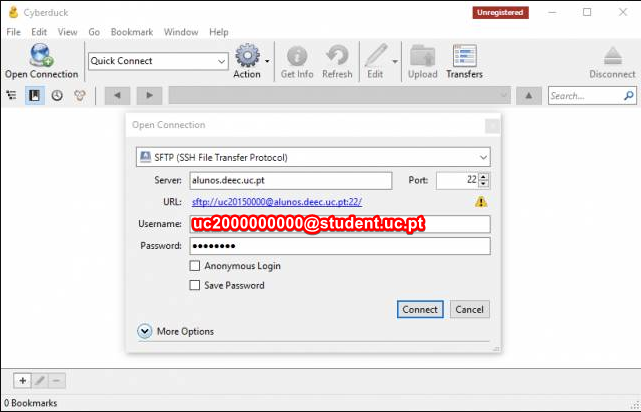
2 - Open Cyberduck, click on Open Conection, select SFTP (SSH File Transfer Protocol) and then fill in the fields according to the image, using your username and respective password

3 - Click on Allow in the next window.

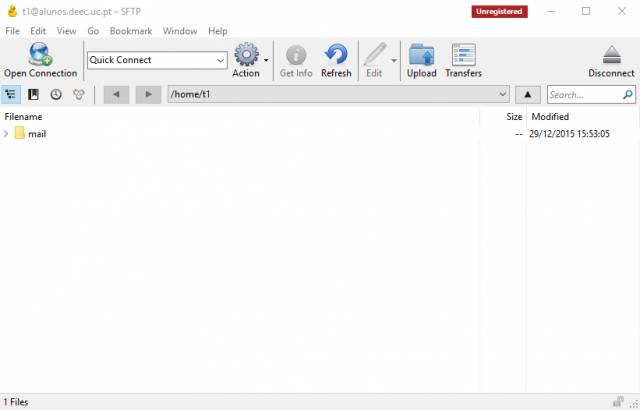
4 - After the connection is established, you can start transferring files between the server and your machine.

Connection to Web and Home servers via FTP TLS / SSL
To use this service, you need to own a @deec.uc.pt account!
This document presents the necessary steps to access via FTP TLS / SSL the servers web.deec.uc.pt and home.deec.uc.pt.
1 - Download and install Cyberduck. To download it click
here (select Windows or Mac OSX).
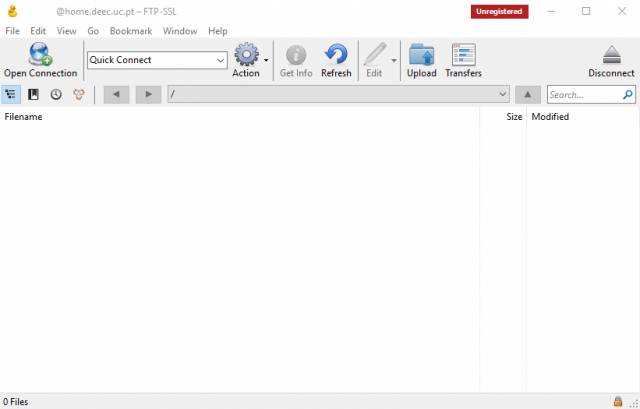
2 - Open Cyberduck, click on Open Connection, select FTP-SSL (Explicit AUTH TLS) and then fill in the server address, as well as your user and password

3 - After the connection is established, you can start transferring files between the server and your machine
MIPS Server
To use this service you need a @deec.uc.pt or @student.uc.pt account!
The DEEC has a server based on the MIPS architecture that run an appropriate LINUX distribution.
To connect to the server and transfer files you need to use “ssh” (secure shell) and “sftp”, respectively. If you are a Linux / Mac user, to connect to the server, run the command:
$ ssh ‘uc20YYXXXYYY@student.uc.pt’@mips.deec.uc.pt
and you will have access to the MIPS machine, whether inside or outside the DEEC LAN. You must use the credentials associated with the University's account (Inforestudante). According to the Computer Network Office, the first time you try to enter the server it will fail and the account will be created. You should cancel the operation (CTRL + C), try again and you will be able to access the server.
If you are a Windows user, you must install free “ssh” and “sftp” clients. A suggestion is to use MobaXterm (https://mobaxterm.mobatek.net/) which allows you to have both clients in one program. These clients do exactly the same as the Linux / Mac commands mentioned above, but using a windowed interface.
After installing and running MobaXterm, to connect to the server you must do the following steps:
1. Press the Session button in the upper left corner

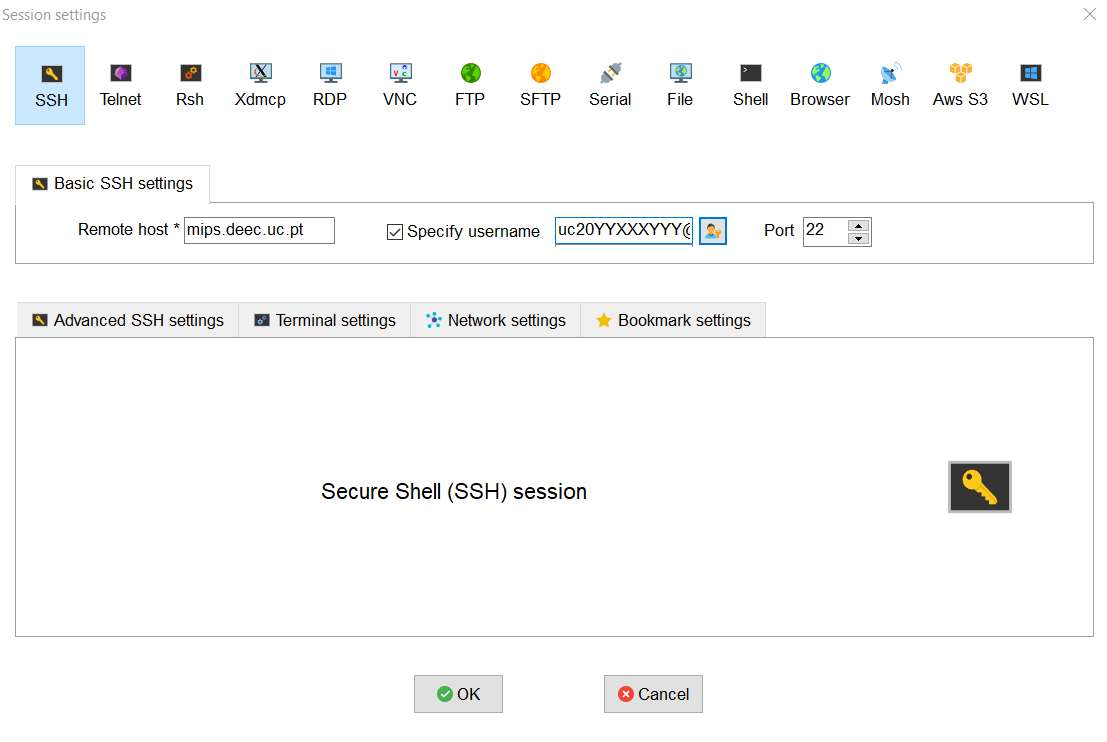
2. A new window should be opened with the title Session Settings that suggests choosing the type of session you want. You should press SSH

3. Fill in the empty fields with the following data:

Remote Host must be mips.deec.uc.pt, select Specify username and fill in the credentials associated with the University account (Inforestudante) uc20YYXXXYYY@student.uc.pt. Clicking Ok will open a command on the console to enter the password associated with your account. If you filled in your data well, an option to save credentials will appear, allowing you to avoid having to enter a password for future access.
Notes:
- Only save your credentials if you are working on your personal computer.
- According to the Computer Network Office, the first time you try to enter the server it will fail and the account will be created. You should cancel the operation (CTRL + C), try again and you will be able to access the server.
4. If you have logged in correctly, you will now have access to the ssh client (console) and sftp (file explorer on the left). To send files to the server just drag them to the sftp client zone. You can also create new files by right clicking on the sftp client area and selecting New empty file.