# Wi-Fi
# Wi-Fi DEEC Description
To use this service you need a @deec.uc.pt or @uc.pt account!
In addition to the EDUROAM network, DEEC has its own wireless network that covers Teachers' offices, most classrooms and teaching labs, providing local addressing and resources.
The complete list of spaces now equipped with Access Points is as follows:
1. Gabinetes de Docente no Piso 1 (4 units)
2. Gabinetes de Docente no Piso 3 (4 units)
3. Gabinetes de Docente no Piso 3A (4 units)
4. Gabinete de Gestão da Rede Informática
5. Laboratório de Apoio Informático 1
6. Laboratório de Apoio Informático 3
7. Laboratório de Automação
8. Laboratório de Circuitos
9. Laboratório de Controlo
10. Laboratório de Electrónica
11. Laboratório de Electrónica de Potência
12. Laboratório de Hiperfrequências
13. Laboratório de Instrumentação e Medidas
14. Laboratório de Máquinas
15. Laboratório de Processamento Digital de Sinal
16. Laboratório de Redes e Sistemas de Computadores
17. Laboratório de Sistemas Digitais
18. Laboratório de Telecomunicações
19. Laboratório de Sistemas Electromecânicos
20. Sala de Estudo
21. Sala T4.2
22. Sala T4.3
23. Sala T5.2
24. Sala T5.3
25. Sala T6.3
26. Sala de Exames
This wireless network (DEEC) is part of the computer infrastructure of DEEC, thus allowing transparent and fast access to DEEC local network resources. The EDUROAM wireless network (see below) is still available in the department's public areas.
For technical configurations, the settings to use for network access are as follows:
| **Definition** | | **Value to set** |
|---|
| Wireless Type | Types of wireless networking technology that supports wireless networking | 802.11 a/b/g/n
Bandwidth up to 900Mbps per space
Support for 2.4GHz and 5GHz frequencies |
| SSID | Wireless Network Name | DEEC |
| Wireless Protection | Wireless Encryption System Type | WPA 2 (AES/CCMP, Dynamic) |
| Authentication
(802.1X) | Method of authenticating a device / user to a protected network | EAP-PEAP + MSCHAPv2 |
| Certificate Validation | Digital Certificate Verification and Validation System | Do not check / Disabled |
| Login | Login of the user who wants to connect to the network | DEEC.UC.PT Domain Email Address
(for example, user@deec.uc.pt, or uc212345678@alunos.deec.uc.pt) |
| Password | Password of the user who wants to connect to the network | Password of the respective account |
1. [Windows 7](https://helpdesk.deec.uc.pt/help/en-us/9-setup-manual/11-windows-7 "https://informatica.deec.uc.pt/redes/redes-sem-fios/instalacao-deec-win7/")
2. [Windows 8.1](https://helpdesk.deec.uc.pt/help/en-us/9-setup-manual/12-windows-8-1 "https://informatica.deec.uc.pt/redes/redes-sem-fios/instalacao-deec-win8/")
3. [Windows 10](https://helpdesk.deec.uc.pt/help/en-us/9-setup-manual/13-windows-10 "https://informatica.deec.uc.pt/redes/redes-sem-fios/instalacao-deec-win10")
4. [Android](https://helpdesk.deec.uc.pt/help/en-us/9-setup-manual/14-android "https://informatica.deec.uc.pt/redes/redes-sem-fios/instalacao-deec-android")
5. [IPhone](https://helpdesk.deec.uc.pt/help/en-us/9-setup-manual/15-iphone "https://informatica.deec.uc.pt/redes/redes-sem-fios/instalacao-deec-iphone")
6. [Apple Mac OS X](https://helpdesk.deec.uc.pt/help/en-us/9-setup-manual/16-macos "https://informatica.deec.uc.pt/redes/redes-sem-fios/instalacao-deec-macos")
To use this service you need a @deec.uc.pt, @uc.pt or any other compatible institution account!
The UC wireless network is part of the Eduroam network and can be used by all teachers, students and employees who have an email account at a UC organization or any other institution that has joined the Eduroam network. Likewise, UC users, when visiting Eduroam institutions, in Portugal or abroad, will be able to access their wireless networks without any change in the configuration of their equipment.
The EDUROAM network is available in the main public areas of DEEC.
Regarding technical configurations, the settings to be used for network access are as follows:
| **Definition** | | **Value to set** |
|---|
| Wireless Type | Types of wireless networking technology that supports wireless networking | 802.11 a/b/g/n
Bandwidth up to 900Mbps per space
Support for 2.4GHz and 5GHz frequencies |
| SSID | Wireless Network Name | DEEC |
| Wireless Protection | Wireless Encryption System Type | WPA 2 (AES/CCMP, Dynamic) |
| Authentication
(802.1X) | Method of authenticating a device / user to a protected network | EAP-PEAP + MSCHAPv2 |
| Certificate Validation | Digital Certificate Verification and Validation System | Do not check / Disabled |
| Login | Login of the user who wants to connect to the network | DEEC.UC.PT Domain Email Address
(for example, user@deec.uc.pt, or uc212345678@alunos.deec.uc.pt) |
| Password | Password of the user who wants to connect to the network | Password of the respective account |
1. [Windows 7](https://helpdesk.deec.uc.pt/help/en-us/9-setup-manual/11-windows-7 "https://helpdesk.deec.uc.pt/help/en-us/9-setup-manual/11-windows-7")
2. [Windows 8.1](https://helpdesk.deec.uc.pt/help/en-us/9-setup-manual/12-windows-8-1 "https://helpdesk.deec.uc.pt/help/en-us/9-setup-manual/12-windows-8-1")
3. [Windows 10](https://helpdesk.deec.uc.pt/help/en-us/9-setup-manual/13-windows-10 "https://helpdesk.deec.uc.pt/help/en-us/9-setup-manual/13-windows-10")
4. [Android](https://helpdesk.deec.uc.pt/help/en-us/9-setup-manual/14-android "https://helpdesk.deec.uc.pt/help/en-us/9-setup-manual/14-android")
5. [IPhone](https://helpdesk.deec.uc.pt/help/en-us/9-setup-manual/15-iphone "https://helpdesk.deec.uc.pt/help/en-us/9-setup-manual/15-iphone")
On Apple Mac OS X operating systems, just select the “eduroam” network, when it is available. The operating system asks for the login (email) and the respective password and the connection is made automatically, through the combination WPA2 + AES + PEAP + MSCHAP_v2.
In case of difficulty, they can contact the Helpdesk service, through the usual channels.
The use of the UC wireless network is regulated by the UC network, RCTS network usage rules and applicable law.
More information:
[Eduroam wireless network at UC](https://idp.uc.pt/idp/profile/SAML2/Redirect/SSO?execution=e1s1&lang=pt_PT "https://idp.uc.pt/idp/profile/SAML2/Redirect/SSO?execution=e1s1&lang=pt_PT")
IMPORTANT TECHNICAL NOTE: If you use an authentication account for the @ deec.uc.pt or @ students.deec.uc.pt domains, you must disable the option to check encryption certificates.
[Autoconfiguration file for Apple systems](https://cloud.deec.uc.pt/index.php/s/v4CyacBrBAt86gG/download "https://cloud.deec.uc.pt/index.php/s/v4CyacBrBAt86gG/download") (Students)
[Autoconfiguration file for Apple systems ](https://cloud.deec.uc.pt/index.php/s/Md1bMdeNGoGEHyN/download "https://cloud.deec.uc.pt/index.php/s/Md1bMdeNGoGEHyN/download")(Collaborators)
To use this service you need a @deec.uc.pt or @uc.pt account!
### DEEC Network Installation Guide on Windows 10
#### Introduction
In this document you will be presented step by step the installation ofWireless Network.
Then click on “Manually connect to a wireless network”:
The fields must be completed, according to the following image:
Attention, the "Network Name" is case sensitive.
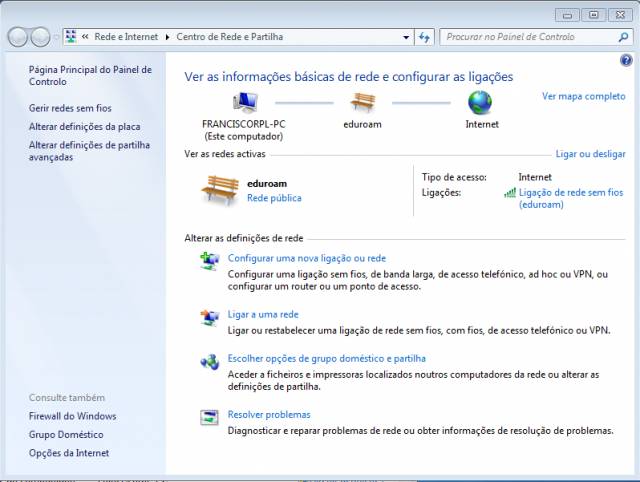
On the next page, go to “Change Connection Settings”:
The configuration to be done in the "Connection" and "Security" tab is explicit in the two images below:
On the “Security” tab, “DEEC Wireless Network Properties”, “Settings”, you should uncheck “Validate Server Certificate”:
In turn go to “Configure” and uncheck “Automatically use login name (…)”:
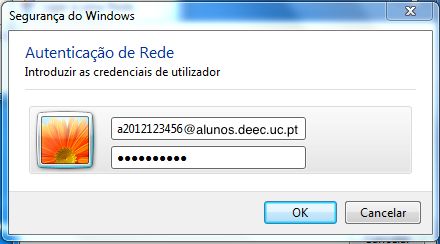
Finally, you only need to enter your user credentials in the DEEC.UC.PT domain:
To use this service you need a @deec.uc.pt or @uc.pt account!
### DEEC Network Installation Guide on Windows 7
#### Introduction
In this document you will be presented step by step the installation of Eduroam Wireless Network.
#### Windows 7
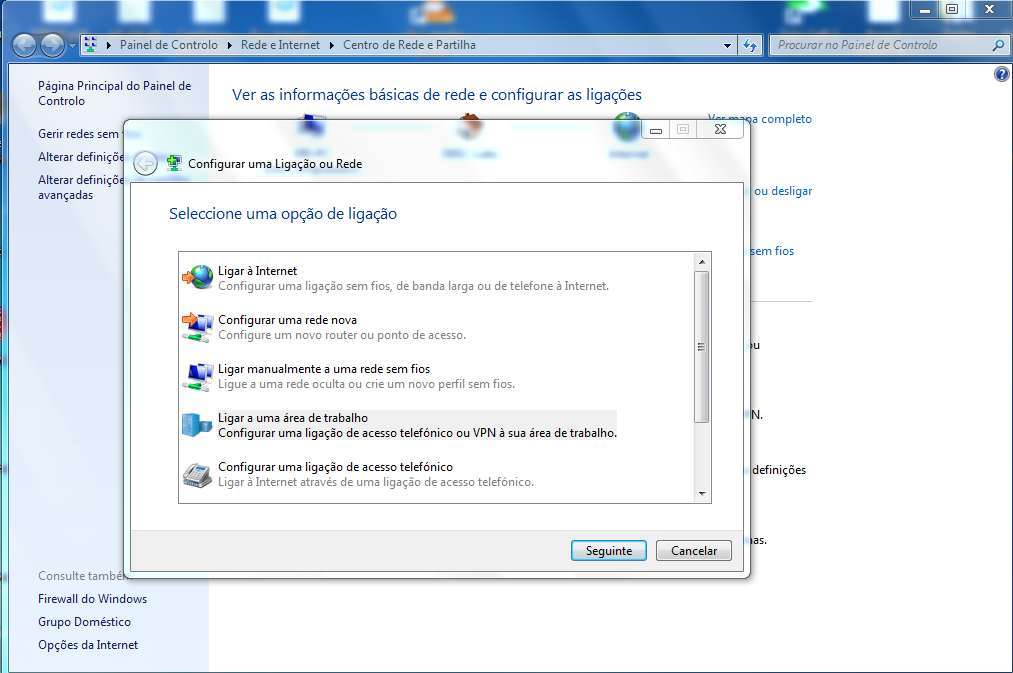
Then click on “Set up a new connection or network”:
The fields must be completed, according to the following image:
Attention, the "Network Name" is case sensitive.
On the next page, go to “Change Connection Settings”:
The configuration to be made in the "Connection" and "Security" tab is explicit in the two images below:
On the “Security” tab, “DEEC Wireless Network Properties”, “Settings”, you should uncheck “Validate Server Certificate”:
Finally, you only need to enter your user credentials in the DEEC.UC.PT domain:
To use this service you need a @deec.uc.pt or @uc.pt account!
### DEEC Network Installation Guide on Windows 8
#### Introduction
In this document you will be presented step by step the installation of Eduroam Wireless Network.
The fields must be completed, according to the following image:
Attention, the "Network Name" is case sensitive.
On the “Security” tab, “DEEC Wireless Network Properties”, “Settings”, you should uncheck “Validate Server Certificate”:
Finally, you only need to enter your user credentials in the DEEC.UC.PT domain:
To use this service you need a @deec.uc.pt or @uc.pt account!
### DEEC Network Installation Manual on Android
#### Introduction
In this document, the installation of the Eduroam Wireless Network will be presented step by step.
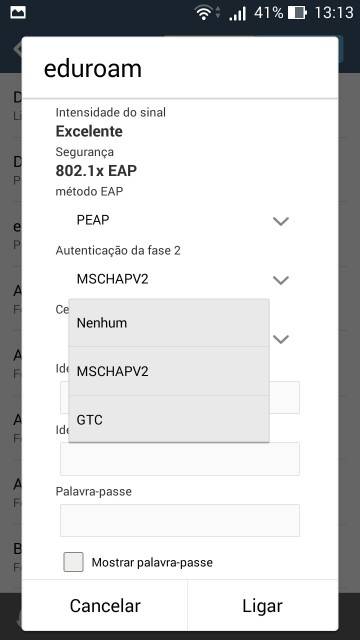
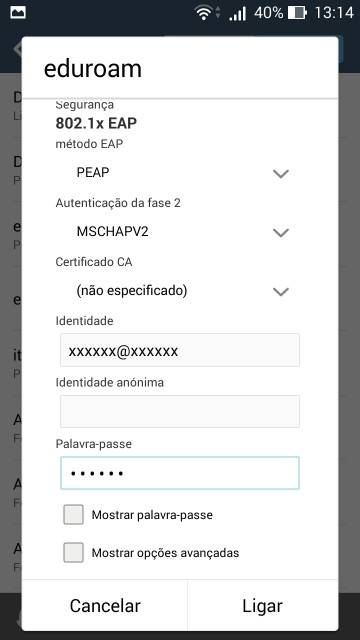
Go to "Settings", "Wi-Fi", select the "Eduroam" network, as in the follg image:

After that, new fields will appear to fill in.
In the “Authentication phase 2” field, you must choose the option “MSCHAPV2”, as in the following image:
Finally, you only need to enter your user credentials (fields: “Identity” and “Password”) in the [DEEC.UC.PT](http://deec.uc.pt/) domain, as in the following example:
To use this service you need a @deec.uc.pt or @uc.pt account!
### IPhone DEEC Network Installation Manual
#### Introduction
In this document, the installation of the Eduroam Wireless Network will be presented step by step.
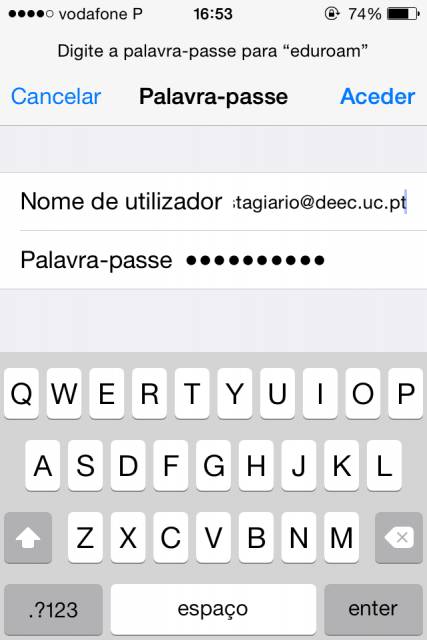
Go to "Settings", "Wi-Fi", select the "eduroam" network, as in the following image:
Then, you only need to enter your user credentials (fields: “User name” and “Password”), as in the following example:
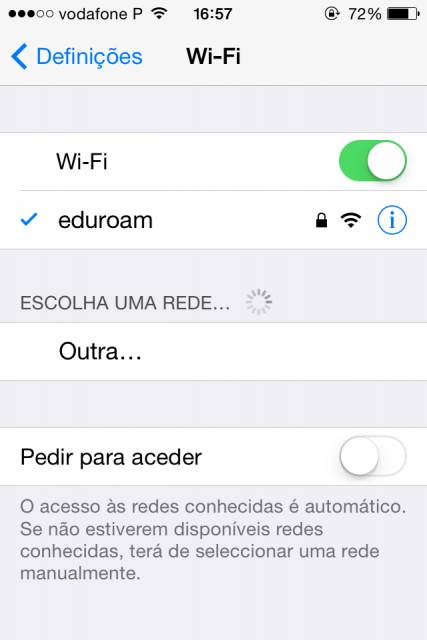
Then it is necessary to press “Accept”, as in the following image.

After completing these steps, the device accesses the network:
To use this service you need a @deec.uc.pt or @uc.pt account!
### DEEC Network Installation Guide on Windows 7
#### Introduction
In this document you will be presented step by step the installation of DEEC Wireless Network.
In the images in this document **DEEC-Labs** should be replaced by **DEEC**.
#### Windows 7
Then click on “Manually connect to a wireless network”:
The fields must be completed, according to the following image:
Attention, the "Network Name" is case sensitive.
On the next page, go to “Change Connection Settings”:
The configuration to be made in the "Connection" and "Security" tab is explicit in the two images below:
On the “Security” tab, “DEEC Wireless Network Properties”, “Settings”, you should uncheck “Validate Server Certificate”:
Finally, you only need to enter your user credentials in the DEEC.UC.PT domain:
To use this service you need a @deec.uc.pt or @uc.pt account!
### DEEC Network Installation Guide on Windows 8
#### Introduction
In this document you will be presented step by step the installation of DEEC Wireless Network.
In the images in this document **DEEC-Labs** should be replaced by **DEEC**.
The fields must be completed, according to the following image:
Attention, the "Network Name" is case sensitive.
On the “Security” tab, “DEEC Wireless Network Properties”, “Settings”, you should uncheck “Validate Server Certificate”:
Finally, you only need to enter your user credentials in the DEEC.UC.PT domain:
To use this service you need a @deec.uc.pt or @uc.pt account!
### DEEC Network Installation Guide on Windows 10
#### Introduction
In this document you will be presented step by step the installation of DEEC Wireless Network.
In the images in this document **DEEC-Labs** should be replaced by **DEEC**.
Then click on “Manually connect to a wireless network”:
The fields must be completed, according to the following image:
Attention, the "Network Name" is case sensitive.
On the next page, go to “Change Connection Settings”:
The configuration to be done in the "Connection" and "Security" tab is explicit in the two images below:
On the “Security” tab, “DEEC Wireless Network Properties”, “Settings”, you should uncheck “Validate Server Certificate”:
In turn go to “Configure” and uncheck “Automatically use login name (…)”:
Finally, you only need to enter your user credentials in the DEEC.UC.PT domain:
To use this service you need a @deec.uc.pt or @uc.pt account!
### DEEC Network Installation Manual on Android
#### Introduction
In this document, the installation of the DEEC Wireless Network will be presented step by step.
In the images in this document DEEC-Labs must be replaced by DEEC.
Go to "Settings", "Wi-Fi", select the "DEEC" network, as in the following image:
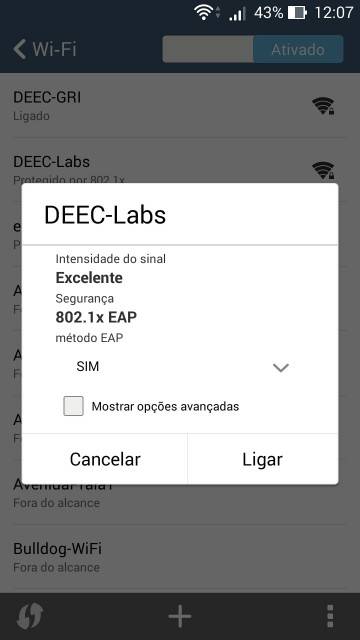
After that, new fields will appear to fill in.
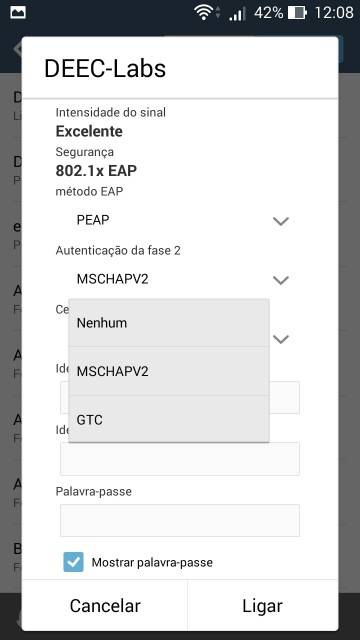
In the “Authentication phase 2” field, you must choose the option “MSCHAPV2”, as in the following image:
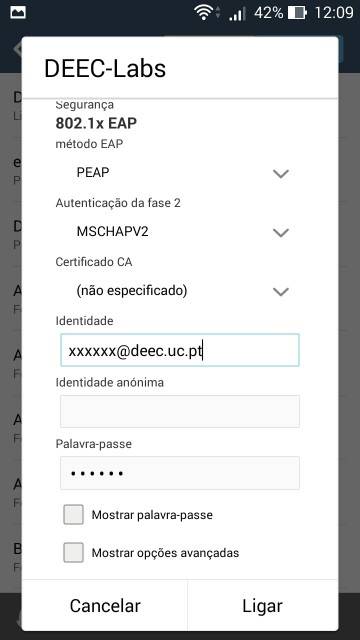
Finally, you only need to enter your user credentials (fields: “Identity” and “Password”) in the [DEEC.UC.PT](http://deec.uc.pt/ "http://DEEC.UC.PT") domain, as in the following example:
To use this service you need a @deec.uc.pt or @uc.pt account!
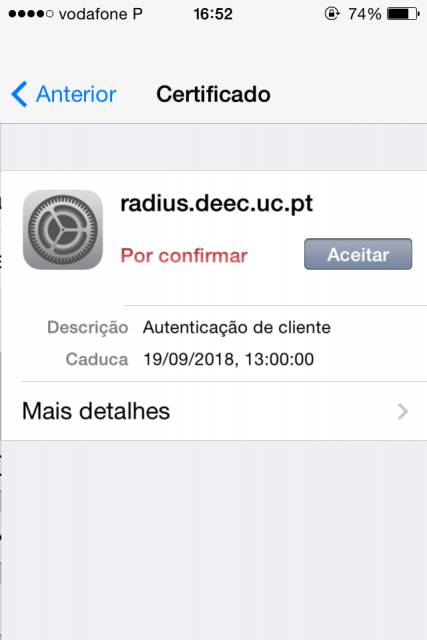
# IPhone DEEC Network Installation Manual
### Introduction
In this document, the installation of the DEEC Wireless Network will be presented step by step.
In the images in this document DEEC-Labs must be replaced by DEEC.
In one of the installation steps, it is necessary to enter your user credentials (fields: “Username” and “Password”), as in the following example:
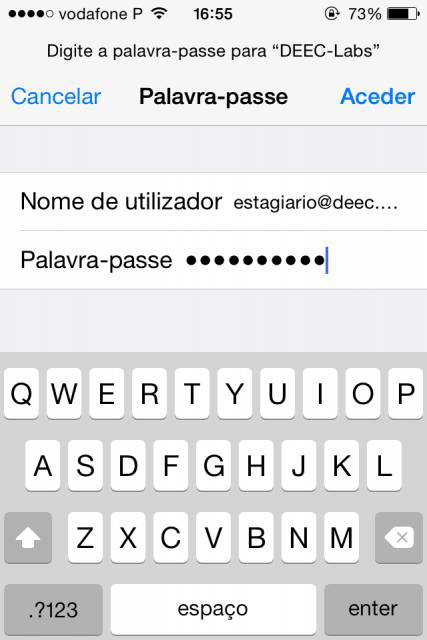
Then it is necessary to press “Accept”, as in the following image.
After completing these steps, the device accesses the network:

To use this service you need a @deec.uc.pt or @uc.pt account!
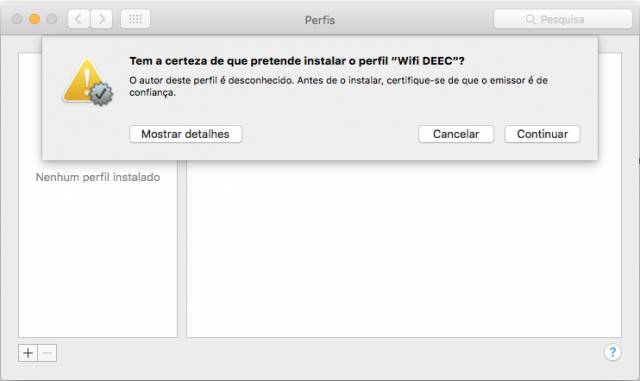
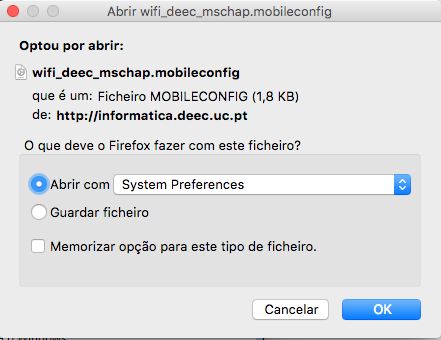
### DEEC Network Installation Guide on MacOS
#### Introduction
In this document, the installation of the DEEC Wireless Network will be presented step by step.
#### MacOS
Install the user profile, located at [wifi\_deec\_mschap.mobileconfig](https://kb.deec.uc.pt/attachments/17)
Choose "Open with" System Preferences.
Select "Continue".
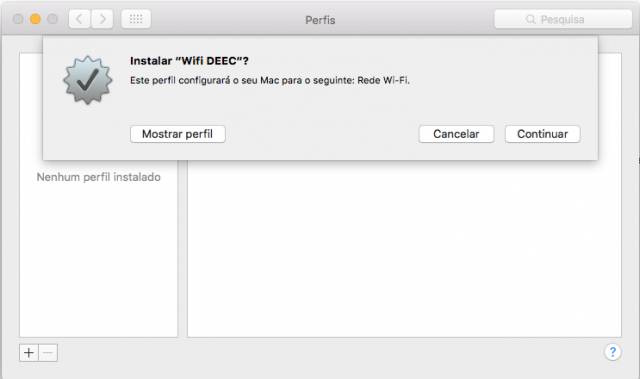
Select "Continue".