# VPN installation manual on Android

<div id="bkmrk-openvpn-installation"><div>OpenVPN Installation, Configuration and Execution Manual on Android  
</div></div>### **Introduction:**

<div class="knowledge-base-article-content richtext-content js-answer-body" id="bkmrk-this-document-will-p"><div class="knowledge-base-article-content richtext-content js-answer-body"><div><div>This document will present, step by step, the installation, configuration and execution of OpenVPN on Android operating systems.</div></div></div></div>### **Preparation:**

<div class="knowledge-base-article-content richtext-content js-answer-body" id="bkmrk-before-starting-the-"><div class="knowledge-base-article-content richtext-content js-answer-body"><div><div>Before starting the installation and configuration of OpenVPN on your SmartPhone, you should check the following point:</div>- <div>Have an account for the configuration of OpenVPN, which is requested from the Management Office of the Computer Network</div>

</div></div></div>### **Installation:**

To download OpenVPN just go to the Google Store and download the following application “[OpenVPN Connect – Fast &amp; Saf SSL VPN Client](https://play.google.com/store/apps/details?id=net.openvpn.openvpn&hl=pt_PT "https://play.google.com/store/apps/details?id=net.openvpn.openvpn&hl=pt_PT")”.

### ![](https://helpdesk.deec.uc.pt/api/v1/attachments/1667)  


<div class="knowledge-base-article-content richtext-content js-answer-body" id="bkmrk--0"><div class="knowledge-base-article-content richtext-content js-answer-body"><div>  
</div><div>![](https://helpdesk.deec.uc.pt/api/v1/attachments/1668)  
</div><div>  
</div><div>  
</div></div></div>### **Configuration and Execution:**

For your configuration, you must download the [IT.ovpn](https://kb.deec.uc.pt/attachments/28) file. Then go to “OVPN Profile”.

![](https://helpdesk.deec.uc.pt/api/v1/attachments/1669)

<div class="knowledge-base-article-content richtext-content js-answer-body" id="bkmrk-go-to-the-file-direc"><div class="knowledge-base-article-content richtext-content js-answer-body"><div><div>
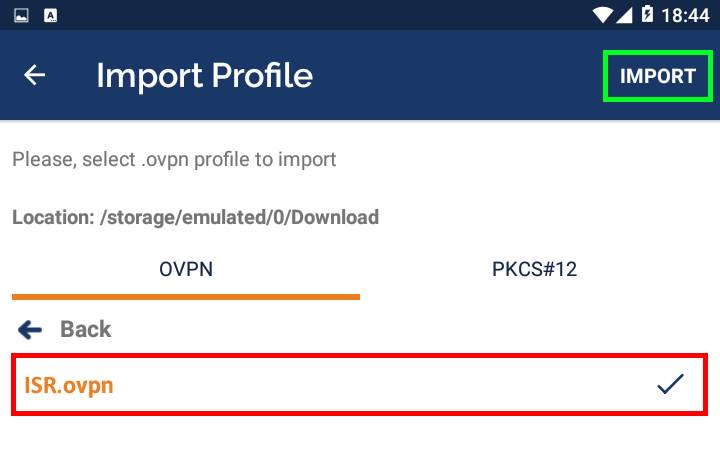
Go to the file directory, select it and do "Import".</div><div>![](https://helpdesk.deec.uc.pt/api/v1/attachments/1670)  
</div><div>  
</div><div><div>
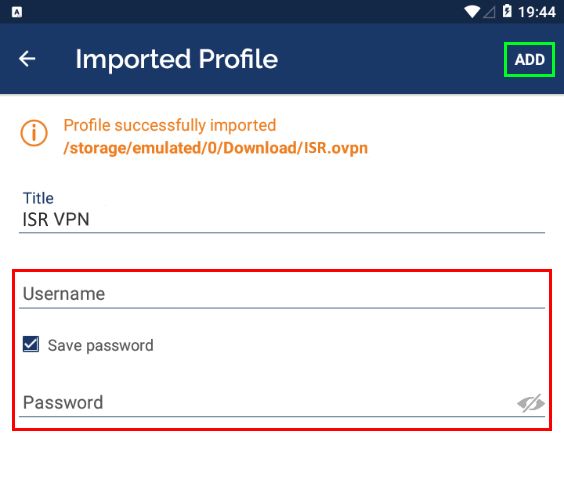
To finish, you will have to insert the credentials obtained by the Management Office of the Computer Network and make "ADD".</div></div><div>![](https://helpdesk.deec.uc.pt/api/v1/attachments/1671)  
</div></div></div></div>